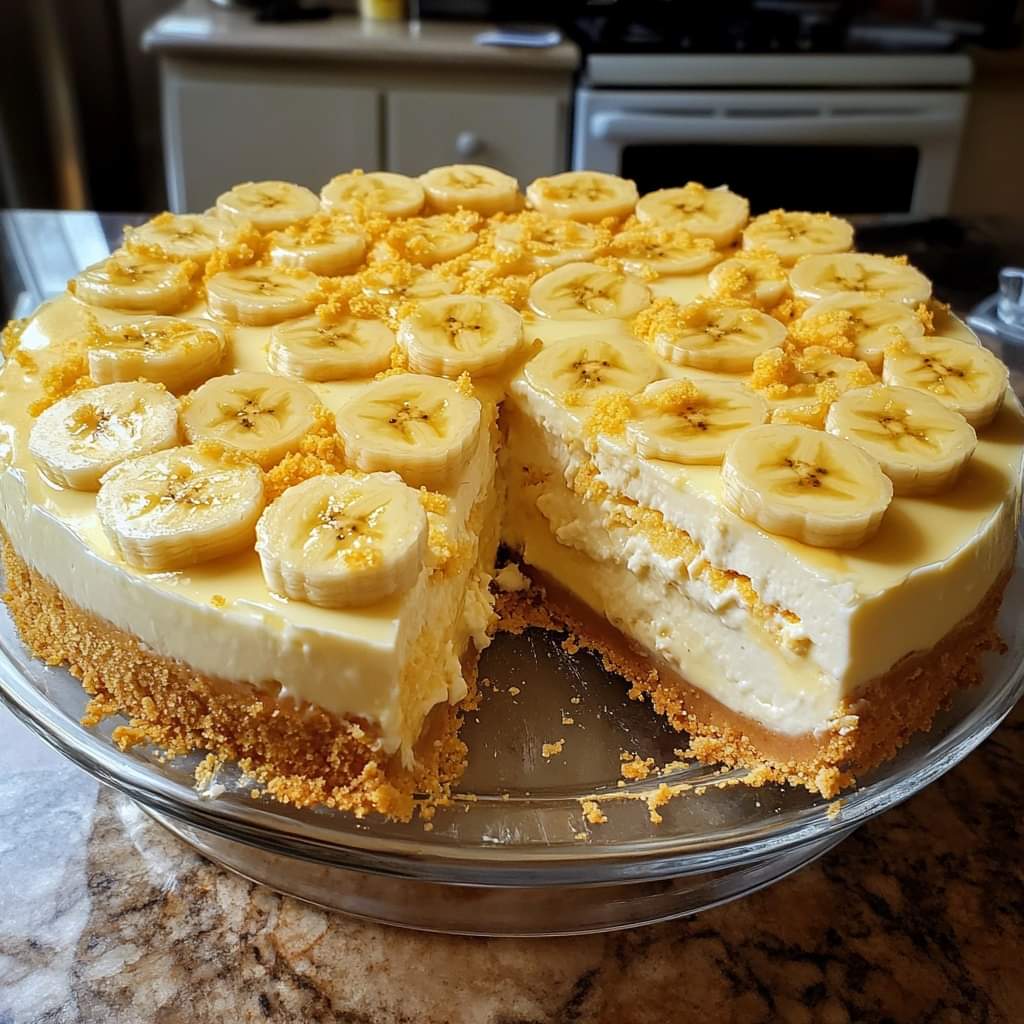
Y’all Ain’t Ready for This No-Bake Banana Pudding Cheesecake
Now listen here, folks, if you’re looking for a dessert that’s gonna make you the star of the family potluck, Sunday supper, or even that big ole tailgate for college football, then you best pay attention. This No-Bake Banana Puddin’ Cheesecake is the kind of treat that’ll make the whole neighborhood stop by just to get a whiff!
Let’s Get Cookin’ (Well, Sorta…)
Here’s the beauty of this recipe — you don’t even have to turn on that oven. Ain’t that somethin’? No need to sweat over a hot stove; this cheesecake sets up nice and firm in the fridge while you relax on the porch with a glass of sweet tea.
What You’re Gonna Need:
For the crust:
- 2 cups vanilla wafer crumbs (that’s about 50 of those lil’ golden beauties, crushed up)
- 1/2 cup unsalted butter, melted down
For the cheesecake filling:
- 2 cups heavy cream, cold like the creek water
- 16 oz of cream cheese, softened up good
- 1 cup powdered sugar
- 1 teaspoon vanilla extract
- 1 package (3.4 oz) of instant banana puddin’ mix
- 1 1/4 cups cold milk
- 3 ripe bananas, sliced just right
For the top:
- Extra whipped cream, for showin’ off
- Some more vanilla wafers, crushed or whole, for that fancy look
- A few banana slices to make it look extra sweet
How We Do It Down South:
- Start With That Crust:
Grab yourself a medium bowl and mix up them crushed vanilla wafers with your melted butter until it looks like wet sand from down at the riverbank. Press it right into the bottom of a 9-inch springform pan — get it nice and even, then stick it in the fridge to chill while you work your magic on the rest. - Whip Up That Filling:
In a large bowl, beat that cold heavy cream ’til stiff peaks form (we ain’t makin’ whipped soup here). Set it aside, but keep it close. Now, in another big ole bowl, beat your softened cream cheese until it’s smooth like Sunday gravy. Add in your powdered sugar and vanilla extract, and beat that mess until it’s all mixed up real nice. - Get That Banana Puddin’ Ready:
In a separate bowl, whisk together your banana puddin’ mix and cold milk for about 2 minutes until it starts thickening up. Then, pour that puddin’ mixture into your cream cheese concoction and mix it up until they get to know each other real well. - Fold In the Whipped Cream:
Take that whipped cream from earlier and gently fold it into your banana cream cheese mixture. You wanna keep it light and fluffy, so don’t go gettin’ all aggressive with it. - Put It All Together:
Pull that crust out of the fridge, lay down a nice layer of those sliced bananas, then pour your cheesecake filling right on top. Smooth it out with a spatula and admire your handiwork. - Now, Chill:
Stick that cheesecake in the fridge for at least 4 hours — overnight if you got the patience — to let it firm up just right. - Show It Off and Serve:
When you’re ready to serve, pile on some extra whipped cream, sprinkle on a few more vanilla wafers (whole or crushed, you do you), and don’t forget those banana slices. Dip ‘em in a lil’ lemon juice if you’re worried about browning, but chances are this thing won’t be sittin’ around long enough to matter!
Tips for the Kitchen:
- Banana Slices Gettin’ Brown? Dunk ‘em in lemon juice before throwin’ ‘em on top.
- Need to Save Some for Later? It’ll keep in the fridge for up to 3 days, though I doubt it’ll last that long!
Y’all, this No-Bake Banana Puddin’ Cheesecake is the perfect combination of creamy cheesecake goodness and that classic banana puddin’ flavor we all know and love. Take it to your next get-together, and watch folks line up for seconds — heck, even thirds if they’re quick about it!